

Christmas is just around the corner, which means it’s time to reach for the glue sticks and get crafty, encouraging students to make everything from stars to snowballs for the classroom.
We’ve pulled together a nifty guide to easy but effective festive decorations that you can make with students. If you have any other ideas for seasonal craft activities share them with us via Twitter, Facebook or in the comments thread.
To get started you’ll need a set of basic craft items, including:
- PVA glue.
- White A4 card.
- String.
- Scissors.
NB. These craft ideas are for primary school classes.
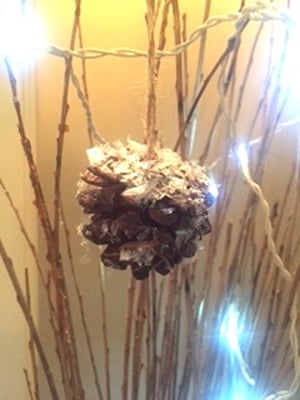
Snow covered pine cones
You will need:
- Basic craft items (see above).
- Pine cones (available online, or in your local park).
- Small paintbrush.
- Iridescent snowflakes (available online or in most craft shops).
Tie the ends of a piece of string together to make a loop, and then glue it to the top of the cone to hang the ornament. Once the glue has dried, dab more glue over the pine cone using the paintbrush, and roll it in the finely cut iridescent snowflakes.
Top tip: Use coloured glitter or finely cut tinsel if you can’t get hold of the snowflakes.
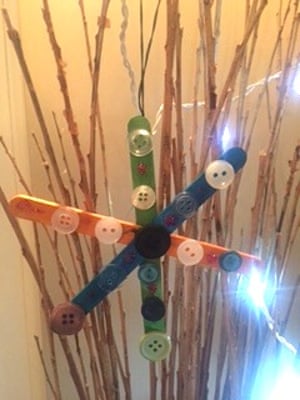
Ice lolly stick stars
You will need:
- Basic craft items.
- Three ice lolly sticks per star (you can get these at most craft shops).
- Poster paint.
- Buttons.
- Glitter.
- Clothes peg.
Get students to paint their three lolly sticks in their preferred colour. When the paint has dried, glue the middle section of each stick together to make a star shape, using the clothes peg to keep it all in place while the glue dries. Meanwhile, make a loop with the string and glue it to the back of one of the lolly stick ends. Once everything has dried, start decorating with the buttons and glitter.
Top tip: Painting the ice lolly sticks can be messy and time consuming. You can find them ready-painted on Amazon if you prefer.
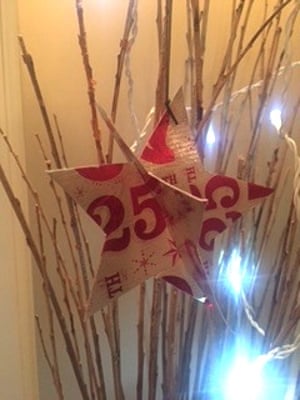
3D star
You will need:
- Basic craft items.
- Five point star template.
- Festive wrapping paper.
This is a great one for older primary students. First take a piece of A4 card and stick festive wrapping paper over both sides. Then cut out two stars from the card using the template. Make a cut from the tip of one arm of each star to the centre so that the two stars can be slotted together to make a 3D shape. (You may want to wipe some glue over the slots to help secure them in place). Make a small hole in the tip of one of the star points and thread the cotton or string through to create a hanging loop.
Top tip: If you don’t have wrapping paper, you can always use plain card templates and ask the children to decorate.
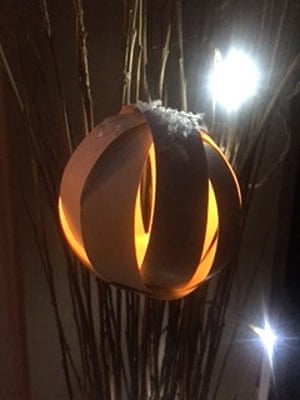
Snowball lantern
You will need:
- Basic craft items.
- Paper fastener (split pin).
- Flameless candle.
Cut five one-inch wide strips from your card (use the card portrait so your strips are long) and lay them on top of each other. Make a small hole half a centimetre from the end of each strip, and another one in the middle of the strips.
Make a loop with one strip and pop the fastener through both end holes so it holds together. Repeat this with each strip so you build up the snowball shape. Fasten the pin and turn the snowball over so that the fastener becomes the bottom. Then thread a loop of string through the holes that you made in the middle the strips (they should should all line up). Finally, add the flameless candle and pop on your tree.
Top tip: Add some iridescent snowflakes or glitter to the top of the card, or use brown card to make the decoration Christmas pudding themed.

S-shaped tree decoration
You will need:
- Basic craft items.
- Needle and strong thread.
- Festive wrapping paper.
- Small plastic tree decorations (bells work best as they are easier to thread) – three per decoration.
Have your A4 card landscape and cut it into three equal strips (they should be short but wide). This will create three decorations. Decorate both sides of each strip, with the festive paper, glitter etc and let them dry.
Take a strip and turn it into a portrait position. Take some thread (around 12 inches should be enough per strip) and push it through one end of the card approximately one centimetre from the edge, then thread one of the bells through. Curve the card over the bell, creating an “S” shape. Push the thread back through, then add another bell, repeat until your three bells (or decorations of your choice) are attached to the card. Make a loop with the remaining thread and tie off. Then repeat with the remaining two strips of card.
Top tip: Instead of using small decorations, use coloured beads instead.
No comments:
Post a Comment